

How Much To Repair Leaking Washing Machine
How to Repair a Leaking Washing Machine
Gear up the nigh common leaks yourself and avoid a $75 service phone call.
![]() Fourth dimension
Fourth dimension
A total day
![]() Complexity
Complexity
Intermediate
![]() Cost
Cost
$51–100
Introduction
Don't panic when the washing car starts leaking water all over the floor! Yous can commonly gear up the trouble yourself within and hour or two at a fraction of the cost of calling a service technician. And only rarely will you lot take to purchase a new motorcar.
This article will assist y'all avoid the expensive service call by showing y'all how to diagnose and fix the most common washing machine leaks.
Tools Required
Materials Required
- Repair parts equally needed
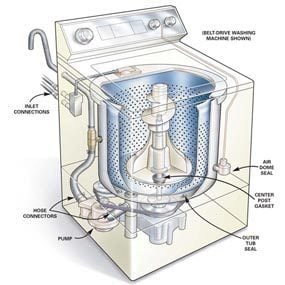
There are only and so many places from which a washing machine can leak. In this how-to commodity we comprehend the most common types of leaks — from the hose, pump and tub — merely there may be additional problem areas specific to your brand of machine. There are two types of washing machine repair: chugalug bulldoze and direct drive. If you open up the chiffonier and don't find any belts, then you've got a direct-drive machine. Repairs are similar for both machines, only generally easier on the straight-bulldoze unit. The following photos are from a belt-drive washing machine. If you have a direct drive, refer to your owner's transmission or diagrams (see "Buying Parts") for brand-specific details.
Simply before you do anything else, make sure the h2o on the floor isn't the issue of a plugged flooring drain. It happens!
Projection pace-by-step (19)
Stride i
Locate the Source of the Leak
- Empty the washing machine, movement it away from the wall and start the fill up cycle.
- Await for drips around the water supply hose connection at the back of the motorcar while it fills with water.
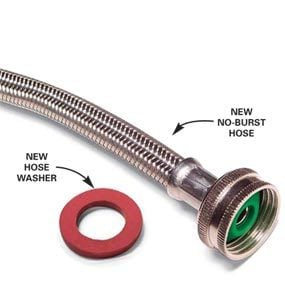
- Shut off the water and replace any old, heavily corroded or rusted hoses with new ones.
- If the hoses are in good shape, replace the internal washers merely.
- Annotation: Special no-burst hoses, regular hoses and new hose washers are bachelor at domicile centers and hardware stores.
Caution!Unplug the motorcar earlier performing whatsoever repairs.
Step 2
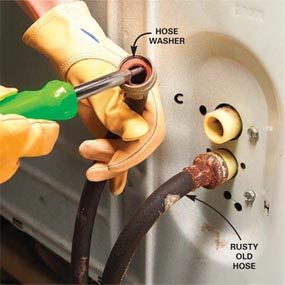
Unscrew the H2o Supply Hoses
- Turn off the water main or shutoff valve.
- Unscrew the supply hoses from the dorsum of the machine with adjustable pliers.
- Pry out the old hose washers with a flat-bract screwdriver.
- Install new gaskets in both hoses and reconnect the supply lines.
![]()
Stride three
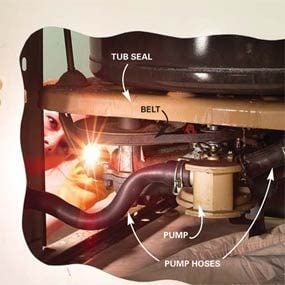
Look Within the Machine
- If the supply hoses aren't leaking, reconnect ability and water supply to the washing machine.
- Unscrew the admission panel from the back of the car or open up the cabinet.
- Wait for leaks while the machine fills with water.
- If you don't see whatever, advance the machine to the agitate cycle and bank check again.
- Annotation: Belt-drive machines typically have a rear access panel that unscrews. Access direct drive machines by removing the two screws on the outside of the control panel and flipping upwardly the chapeau. And so pry up the cabinet clips and pull off the entire cabinet.
Step 4
Remove the Former Hose
- If y'all've found a leaking hose inside the washer, clasp the hose clamp together, slide information technology downward the hose and pull off the hose.
- Annotation: Hoses tend to leak around a worn-out spring clamp.
- Pro tip: Keep a bucket or pan handy so you lot can catch any residual water left in the hoses.
- Replace the hose with an identical part and new worm-drive clamps.


Step v
Replace a Leaky Pump
-
- Note: The pump usually leaks around the pulley seal. If you spot water leaking from this spot, the pump is shot and will take to be replaced.
- If a leaky pump is your problem, disconnect the power and h2o supply again.
- Tip the machine upwards against the wall.
- Cake upward the front with a motorcar jack or 2x4s and so it can't tip over while you lot achieve underneath.
- If the belt is darkened from called-for or is worn down to the threads, replace it, too.50
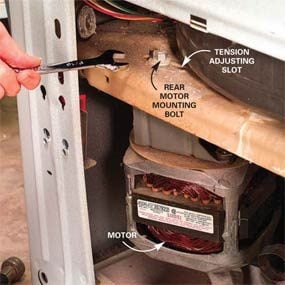
Step vi
Loosen the Bolts
- Loosen the two motor mounting bolts to relieve tension on the chugalug.
- Note: One volition exist at the rear of the cabinet and the other is nearby.
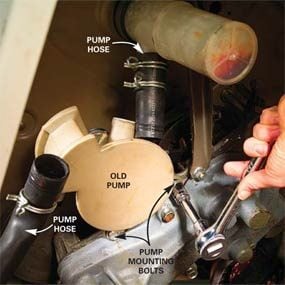
Stride 7
Remove the Old Pump
- Disconnect the pump hoses.
- Unscrew the pump mounting bolts.
- Tip the pump pulley abroad from the chugalug and wiggle the pump loose.
- Note: Direct-bulldoze pumps will just unscrew or unclip.
Step 8
Install the New Pump
- Slide the pump lever into the anarchist slot and align the belt with the pump pulley.
- Line up the bolt holes and firmly tighten the mounting bolts.
- Reconnect all hoses and clamps.

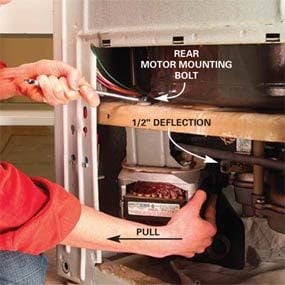
Step 9
Retighten the Bolts
- Pull against the motor to tension the chugalug and so tighten the rear motor mounting bolt.
- Note: The belt should deflect about 1/ii inch when you push against information technology.
- Tighten the mounting commodities located on the opposite side of the motor.
Step 10
Replace Worn-Out Tub Fittings
-
- Note: The almost challenging repair is fixing a leaking tub plumbing equipment, whether it'southward the air dome seal, the center postal service gasket or the tub seals.
- Before proceeding, make sure that telltale drips are coming from around the tub.
- Note: The details of this repair vary by brand and model. The details nosotros show are for most Whirlpool and Kenmore belt drives. Study a schematic drawing or consult a parts specialist if your motorcar is different from what we bear witness.
- Note: You'll need a special spanner wrench to remove the tub and supercede the tub fittings on this type of machine. It's bachelor at your local apparatus parts supplier.
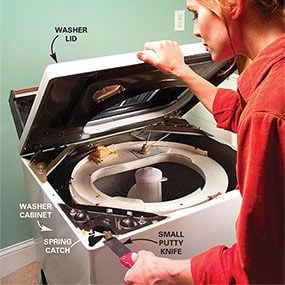
Footstep xi
Lift the Lid
- Slide a small putty knife between the washer hat and the cabinet.
- Push button the putty knife against the spring take hold of while lifting up on the lid.
- Release both catches and fold the lid back.
Step 12
Lift Out the Tub
- Pop off the tub ring clips.
- Lift the tub ring out of the cabinet and set information technology aside.

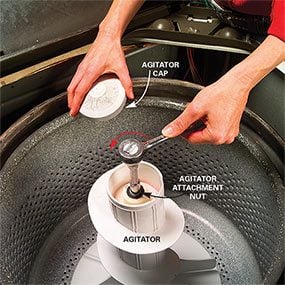
Step 13
Remove the Anarchist
- Twist or pry the cap off the agitator.
- Unscrew the attachment nut and pull the anarchist upwardly and off the bulldoze shaft.
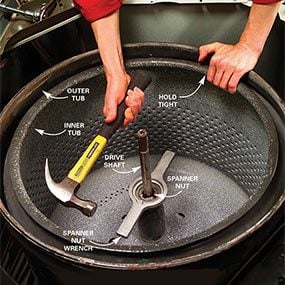
Step 14
Loosen the Spanner Nut
- Hold the inner tub tight to the outer tub.
- Rap the special spanner wrench to break the spanner nut gratuitous.
- Remove the spanner nut.
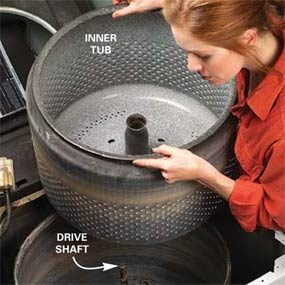
Pace fifteen
Lift Out the Inner Tub
- Lift the inner tub up and off the bulldoze shaft.
- Pro tip: You might have to jerk it dorsum and forth to help piece of work it loose.
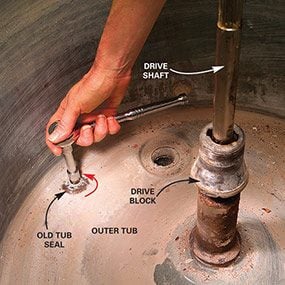
Pace 16
Remove the Onetime Tub Seals
- Unscrew the old leaky tub seals from the outer tub.
- Pro tip: Later, when you install the new tub seals, make sure the metallic washer is on height of the rubber washer.
- Annotation: There are four tub seals that secure the outer tub to the cabinet, each consisting of a bolt with a rubber and metallic washer. Rust often develops around i of the tub seals, causing a tub leak. A new tub seal kit will come with four new bolts and oversized rubber and metal washers that will seal small leaks. Just if the tub is completely rusted through around the bolt, information technology's fourth dimension to buy a new washing automobile.
Step 17
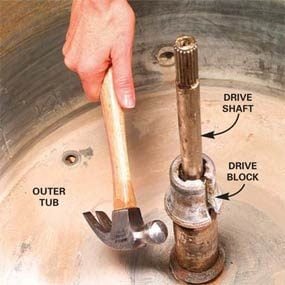
Loosen the Bulldoze Cake
- Tap up on the bulldoze block with a hammer to intermission it loose from the bulldoze shaft.
- Pull off the bulldoze block and set information technology bated.
- Lift the outer tub from the cabinet, twisting information technology back and along to work it loose.
Step 18
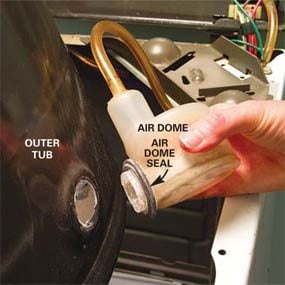
Remove the Air Dome
- Twist the air dome a quarter turn and pull it free from the outer tub.
- Pry off the old air dome seal and replace it with a new one.

Stride 19
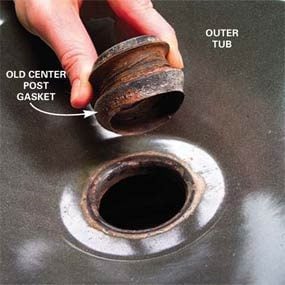
Remove the Post Gasket
-
- Note: If the leaking occurs simply when the auto is agitating, a bad center post gasket ("doughnut") is the culprit. Remove the outer tub to supercede the eye post gasket. While you're at it, replace the air dome seal every bit well.
- Squeeze the center post gasket together and pull it from the bottom of the outer tub.
- Install a new middle mail gasket.
- Reassemble the washing machine and run a test bicycle.
Buying Appliance Parts
Washing machine parts are available at appliance parts distributors. Try to discover a parts supplier with well-informed staff, ideally ex–repair technicians, who can provide diagrams and help diagnose whatsoever issues specific to your brand of car. A great Cyberspace source is www.searspartsdirect.com. Enter your model number to access exploded-view diagrams and a thorough parts list for easy on-line ordering.
You'll need the brand and model number for proper function identification. Model numbers are usually stamped on a small metal plate located under the tub lid or on the side or back of the machine. Copy down all the plate information and accept information technology along to the parts distributor.
Originally Published: November 04, 2022

How Much To Repair Leaking Washing Machine,
Source: https://www.familyhandyman.com/project/how-to-repair-a-leaking-washing-machine/
Posted by: grayroyes1945.blogspot.com
0 Response to "How Much To Repair Leaking Washing Machine"
Post a Comment